Showing posts with label renovation. Show all posts

Wednesday, 10 February 2016

What Lies Beneath

Generally speaking, tiles would not be my choice of flooring for anywhere other than the bathroom. Even at that, I found it very hard to find tiles I really liked when we renovated our bathroom a couple of years ago. We settled on these wood-effect tiles in the end and I am still very happy with them.

Our wood-effect tiles in the bathroom

The only exception to my no-tiles-outside-the-bathroom rule is if the tiles are beautiful, original vintage tiles. I love the look of 1930s or 40s hallways - a plain border and a geometric pattern in various colours along a narrow hall with the staircase on the right. 

When we were making some changes to our house before moving in, we had a toddler, a newborn and a tight budget. We painted the hall and left the laminate floor as it was, since it was in good condition. 

Soon after we moved in, our neighbours mentioned in passing that it must be nice to have a tiled floor. We, puzzled, said we have laminate. "Oh, they must have put that down over the tiles" they said of the previous owners. Apparently, there once was a nice tiled hall floor in this house. 

Mid-renovation. The floor stayed.
In my grandparents house, which happens to have been built around the same time as ours, there is still the original tiled hall floor. I keep imaginging that there is something similar underneath our laminate. Something along the lines of these patterns would be fantastic.


The curiousity has been gnawing away at me for years now. Every so often I bring up the subject of ripping up the hall floor with The Bavarian. He is curious too, but practical. The laminate is well attached. There is no option of pulling out a slat or two to see what is underneath. It is an all-or-nothing job.

What if there is just a concrete floor? Or ugly  or damaged tiles? Do we really want to risk it when we haven't the budget or the time to deal with the disaster that may result?

For now, we have decided to leave the floor till the boys are older. It is the sensible parent thing to do, isn't it? The laminate is warmer than tiles and there is less chance of things breaking if they are dropped that if they were dropped on tiles. 

So for now I will dream of my double doors and original tiled floor and save for reproduction tiles in case there is nothing to discover beneath the laminate. 

If you are interested, pop over to Pinterest and have a look at the looks I am currently swooning over. 


Home Etc

Wednesday, 3 February 2016

In Search Of Hall Doors

Our house was built in the mid 1950s, a time when Germany was still receovering from the second world war and when people had to make do with a lot less than nowadays. 

This house, like most of the houses on our short street, was built as a small house with a good-sized garden for growing fruit and vegetables. Attached to the house, when it was built originally, was a shed for housing animals. 

The previous owners of our house renovated the former animal accommodation and made a bathroom and two bedrooms out of it. The hallway was extended by about 90cm in length in the process. 

Where the front door was originally is now an doorway. The hinges and doorframe remain. For a few years we used to talk about putting a curtain across it but we never got round to it. The more I think about it, the more I see that it would block out the light that comes in from the windows in the front door.

Lately I have been thinking that what we need to finish off the hall is a set of narrow double doors. I'm thinking wooden doorframes painted white or a light grey and with bevelled glass panels to let in light but keep out draughts.

Photo Credit / Source

I really like the look of this set- shabby but incredibly elegant. I can imagine them opening inward, letting the sunshine our into my sparklingly clean hall, something like the scene in the picture below. 

dream house: the front door.:
Photo Credit / Source


As I say, in my imagination. My hall is never this clean.

For the moment I'll have to keep dreaming, of the doors, of the sunshine and of the sparkling hall. Glass doors and sticky toddler hands don't pair well. 

I've begun looking for inspiration on Pinterest, so pop over and take a look at my board to see more of what I'm hoping to one day have.


One of these days I'll be taking measurements and keeping my eyes peeled for doors to salvage or pick up at a flea market. Where there's a will, there's a way. 


Home Etc

Friday, 22 January 2016

Sudden and Unanticipated Changes to the Bathroom

If one was to spend the better part of the afternoon urging and cajoling a very stubborn child to please finish their homework and stop acting the maggot, and if one was then to take a small child along into the bathroom and try to clean the bathroom and if one was then to get annoyed with the stupid ugly wonky old towel hanger, toothbrush holder and soap dish which the previous house owners installed and which you never liked anyway  and if one was to decide to remove them immediately, what would one use for the job?

Supposing the urge to remove said accessories strong and the only tools to hand  in the bathroom were a scissors, a nail clippers and some bathroom wipes, would one proceed with the job? Even if some accessories were attached with +  screws and some with - screws? And if one did, would one make it a personal goal to get the effing rawl plugs out too while one was at it?

If one did, the results *might* look something like this and one *might* be overcome with a sense of calm and the feeling of being the MacGyver of the female DIY world.  


This is not a true story. If  I had included the bit about the Lego man being thrown into the freshly cleaned toilet by the small child, his being delighted with seeing the Lego man go swimming and then drying his off excitedly with a towel, having fished him out - if I had included all of that, then it would be a true story.   

Tuesday, 20 October 2015

Toy Grocery Shop Restoration Project

Several months ago I wrote a post about my two restoration projects for Number Three's birthday. Unfortunately only one of them, the rocking horse, was completed in time. The other, the little old-fashioned shop, remains in the garage and makes my conscience cringe with guilt every time I see it sitting there unfinished. Bad mother, bad, bad mother!
 I was full of good intentions. Back in May I bought and applied paint stripper, only to see that the paint that was used on it is somehow resistant to paint stripper. Instead of blistering and flaking, the paint turned to a slimey goo and simply would not come off. Scraping at it only made it worse.


Disheartened by this, I turned my full attention to the rocking horse and put the problem paint out of my mind. 

Now that the horse is finished, I really have to get cracking on the shop so that it is finished by Christmas. In a recent fit of enthusiasm I ordered some chalk paint online and clicked on to Pinterest to assist in finalising the ideas that I have in mind for how the shop should look.

The paint has arrived and I am really pleased with the colours, Larch, Snow and Ocean, all by Quick. It remains to be seen how well they will adhere to the strange paint that the shop was painted with. I haven't used this brand before.
As for the design of the shop, I think I will use Snow as the background colour and add the detail and signage in Larch green and Ocean blue. That should, I hope, give it a nice, fresh look as well as letting it blend in well, regardless of whether the shop ends up being housed in Number Three's bedroom or in the playroom.


In order to personalise the shop for Number Three, I intend to stencil retro lettering on the front panel, hence the many shop signs on my Pinterest board. Currently I think I may go with something along the lines of this.
So please keep your fingers crossed that I will somehow find the time to get the sandpaper, brushes and paints out so that Number Three can set up shop in time for the new year. 


Home Etc

[Disclaimer: This is not a sponsored post. I bought and paid for the paints myself. I was not asked to write this post. All photos, text and opinions are my own]

Sunday, 11 October 2015

My Long-Awaited Kitchen Blackboard

Chalkboards are in, apparently.  I didn't really realise this. Since we moved into our house five years ago I have wanted to paint one on the kitchen wall. But The Bavarian wasn't so keen. I still bought the paint and I renovated two old blackboards, one for the kids and one to hang in the kitchen. But after all that, I still knew I really wanted a large space on the wall for shopping lists, etc. 
Did you figure out who is drawn here?
Darth Vader and Yoda
So I bought more paint and got to work on convincing The Bavarian. We recently removed the kitchen door and this exposed the awkward wallspace between the fridge and the doorframe. It was terribly marked from five years of life with small children. It needed a lick of paint, so why not use the blackboard paint?  He gave in, I got my brushes out. 

I'd been oogling 'kitchen chalkboards' on Pinterest and had a few ideas of what would suit our kitchen. (Blackboard seems to be the not so cool term these days but I can't get used to chalkboard, sorry). While a full-wall blackboard would look great around our doorframe, it would darken the kitchen too much.


In the end I settled on painting the wall from the skirting board up to the height of the fridge. The plan is to trick around a bit and add a slogan or banner with a chalk marker at the top, but I have yet to decide on it. For the moment, The Bavarian and the boys have been attacking my blackboard and leaving me little space for my own notes. But since the kitchen is the heart of our home, I'll let them away with it. For now. 

Usually I am very tempted to skip preparation and get straight to the painting, but after waiting for so long to get this project started , I wanted it to turn out well. Here is what I did:

1. I washed the wall with warm water to remove any dirt or greasy marks.

2. Using the spirit level and a pencil, I marked the size and shape of the blackboard onto the wall.

3. I used masking tape along the pencil lines as well as along the door frame and skirting board to ensure clear edges and unharmed woodwork.
4. There were a few small dents in the wall, so I filled these up with wall filler and a spatula and left it to dry overnight. 

5. The following day I applied the first coat of paint around lunchtime and a second coat just before going to bed. 

6. Getting up the next morning I was so excited about pulling off the tape and seeing the lovely clean lines of my blackboard. 

7. I read somewhere, while doing all my research, that before using a freshly-painted 'chalkboard', you should colour in the whole board lightly with white chalk and then take one of those magic eraser sponges (dry) and wipe the chalk off again to give it that chalky look. It is so much nicer than the stark black of the paint. I did it and it turned out really well. The poor Bavarian got a giving out to from me when he washed the whole board with water while I was out later that morning and put his own message on it.

Home Etc

Wednesday, 30 September 2015

Coat Rail Makeover with Mini Door Knobs

You may or may not already know of my love of bringing new life to old furniture. Sometimes I take it to extremes, taking something that really doesn't have a lot of potential, hidden beauty or any other redeeming features and making something out of it. The Bavarian despairs of me when I refuse to throw out what most people consider rubbish. In the particular case I am going to show you today, the object in question is a broken coat rail that the previous owners of our house left in the cloakroom.

It was the kind of coat rail you can find in any DIY shop for a few quid, made of cheap pine. Of the original six wooden pegs, only four were left. One was very loose. The other three were well secured still. Why bother keeping it? Well, the simple answer is beacuse it might come in handy. The truthful answer is that I cannot accept that something that is not completely irreparable should be dumped because we don't definitely need it right now.

So the rail sat in the cellar for four and a half years until one day in a full-to-bursting trinket shop in Dachau of all places I found the *perfect* knobs to replace the three missing ones. And so the make-over could begin.

To transform my coat rail I needed:
White undercoat suitable for use on wood
Cream satin finish paint
Three small dooor knobs
A drill
A paintbrush

First of all I gave the rail a good cleaning with a damp cloth. It had been in the cellar, so a fair amount of dust and cobwebs had gathered on it.

After that, the whole thing got a coat of white undercoat, knobs and all. After the undercoat had dried, I applied two coats of cream satin finish paint, letting the first coat dry overnight. 
During the painting, the holes for the screws to attach the rail to the wall had become clogged, so these needed drilling through to unclog them. The holes for the screws of the mini door knobs also needed widening, so the drill was used for that job too.

Once the holes has been cleared, the project got to the good part - adding the unique touch. This is the part of renovation projects I love most, making the item my own. 

In this case, I had already selected the knobs. Now I needed to arrange them in the order I wanted. I chose to put the flat-topped knobs to the left and right and place the round-topped knob between two of the original wooden hangers.
Here you can see the rail and knobs in a bit more detail.


Hung on our pale green bedroom wall, the rail has become very handy for scarves, chains or handbags. I am so happy thatit has finally make it out of the cellar and avoided the bin.


Home Etc

Tuesday, 8 September 2015

Horsey, horsey, don't you stop....

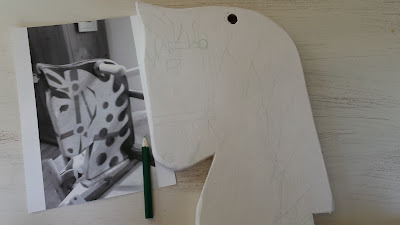
Back in May, I announced my intention to renovate a shabby, wobbly old nag of a rocking horse as a present for Number Three's first birthday. I was full of inspiration and enthusiasm and had a baby who slept for about 90 minutes mid-morning, so I got off to a good start.

 But in mid-July, almost overnight, my baby became a toddler, sleeping less, starting to walk and generally scuppering his mammy's grand plans. So poor horsey lay in pieces in the shed, stripped of his old red plastic, sanded down and wood-glued in places, waiting for the day when he would get his long-promised make-over.
As Number Three's birthday loomed, I struggled to recapture my enthusiasm and get back to work. Just as I had begun again, Number One got sick and my time was limited again. 

So his birthday came and went. He got a book instead of a rocking horse. He felt rotten because of his fever and I felt terrible that my good intentions had come to nothing. 

Eventually, after a couple of days I got a burst of creative energy. I pulled a few night shifts and enlisted the help of The Bavarian, Number One and Number Two in design matters. Between us we agreed on a colour scheme. I gave the whole horse a second coat, painted the face details, covered the seat and plaited the reins. 


Just under a week after Number Three turned one, his present is finally ready and I cannot wait to see his reaction.


If you enjoyed this, why not pin it? 


Home Etc

Tuesday, 30 June 2015

How to Make a Window Mirror - An Upcycling Tutorial

I *may* have mentioned before that I have a thing for salvaging furniture. A few weeks ago I think I reached a new low. It was pouring rain and I should have been driving directly to Kindergarten so as not to be late.  But it was Sperrmuell day on part of your route. Sperrmuell is the German term for the  annual rubbish collection of furniture, electronic appliances and other oversized items. Basically anything one might normally throw into a skip is left on the footbath to be collected by the bin men. In short, my idea of heaven.

On this particular morning, I was in a rush but needed my fix of salvaging, now that I'd seen what day it was. Unfortunately there wasn't time for more than a quick glance. I spotted kitchen cabinets being dumped, stopped for a nosey and picked up this cabinet door. The glass was gone and it was soaked from the rain. But I thought I might be inspired to upcyce it into something. I love internal windows in houses. That was my starting point.

To cut a long story short, it became a mirror. You may have spotted it in last week's hall renovation post. Here is how I went about it.

Clean the window frame and sand it, if necessary. Thankfully mine didn't need sanding.
Paint with two coats of undercoat suitable for use on wood.
Paint with a top coat of the colour of your choice. I chose a pale cream in a satin finish.


Once I had the woodwork finished, I brough the frame to the DIY centre. I was between two minds as to how to proceed: mirror or photo frame. I tried it out with some passepartouts and it looked fine, but I preferred the idea of a mirror after I tried out both looks.

Luckily I was able to find a mirror in the correct size, but the DIY centre would have ordered one to the correct size if I had needed it. I used a special glass and mirror glue to fix the mirror to the frame.


The mirror now hangs in our hall and helps brighten the place up by reflecting the white of the stairs and wall opposite it. 


A couple of weeks after I had finished and hung my mirror I was shopping and spotted the mirror in the photo below. I couldn't help myself and had to look at the price tag on the back. €99! Mine cost me around €20 for the mirror, glue and hanging fixture I needed. I had the paints and brush already from other projects. But best of all, I had a great time working on it and that is priceless.


Home Etc